Transforming Illumination: A Guide on Replacing Recessed Lighting with Flush-Mount Lighting
Introduction
Recessed lighting offers a sleek and modern aesthetic, but there are instances where a switch to flush-mount lighting may be more suitable for your space. Whether it’s a style preference, ceiling constraints, or a desire for a different lighting scheme, the process of replacing recessed lighting with flush-mount fixtures can be straightforward with the right guidance. In this comprehensive guide, we’ll explore the steps, considerations, and frequently asked questions associated with this lighting transformation.
I. Understanding the Transition
1. Why Switch from Recessed to Flush-Mount Lighting?
Flush-mount lighting is an excellent choice for those seeking a more traditional or decorative look. Additionally, if your ceiling structure poses challenges for recessed lighting, such as low clearance or obstructions, flush-mount fixtures offer a viable alternative.
2. Assessing Ceiling Condition:
Before making the switch, evaluate the condition of your ceiling. Ensure it can accommodate the new flush-mount fixtures and assess any potential modifications required.
II. Materials and Tools
1. Flush-Mount Lighting Fixture:
Select a flush-mount fixture that complements your space. Styles range from contemporary to classic, allowing you to find a fixture that aligns with your design preferences.
2. Screwdriver:
A screwdriver is essential for removing the existing recessed lighting fixture and securing the new flush-mount fixture.
3. Wire Cutter and Stripper:
If adjustments to the wiring are necessary, having a wire cutter and stripper on hand is crucial for a clean and secure connection.
4. Voltage Tester:
Ensure safety by using a voltage tester to confirm that the power is off before starting the replacement process.
5. Ladder:
Depending on the height of your ceiling, a ladder may be necessary for safe and convenient access to the recessed lighting fixture.
III. Steps to Replace Recessed Lighting with Flush-Mount Lighting
1. Turn Off Power:
Prioritize safety by turning off the power to the recessed lighting fixture at the circuit breaker. Confirm the power is off using a voltage tester.
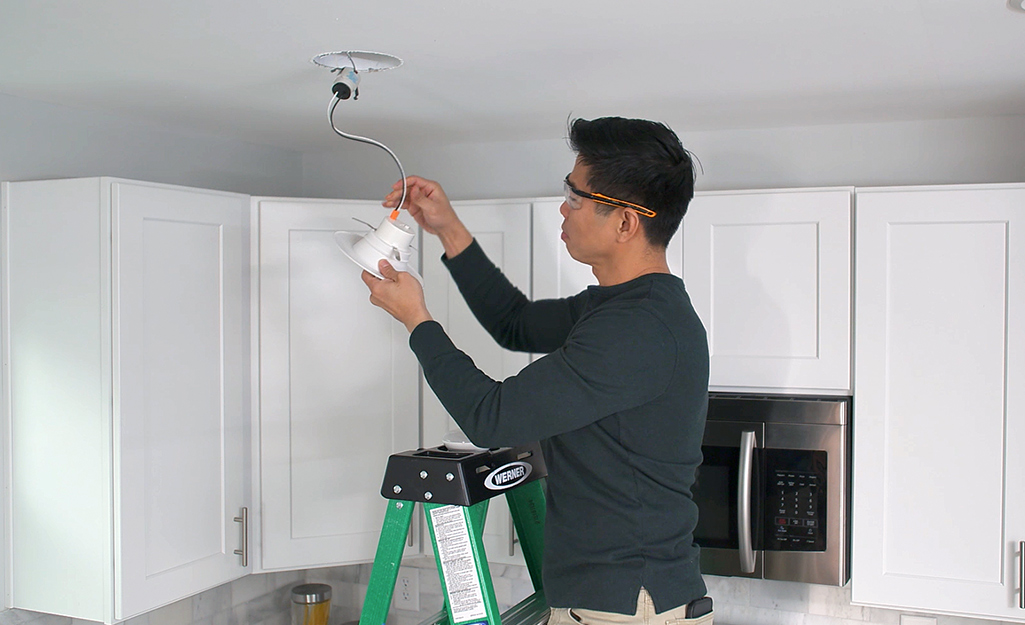
2. Remove the Recessed Lighting Fixture:
Carefully unscrew and detach the existing recessed lighting fixture from the ceiling. Disconnect the wiring, taking note of the color-coded connections.
3. Adjust Wiring if Needed:
Depending on the wiring of your flush-mount fixture and the recessed lighting setup, you may need to adjust or modify the wiring. Follow the manufacturer’s instructions for the new fixture.
4. Install the Flush-Mount Fixture:
Secure the flush-mount fixture to the ceiling using the provided screws. Follow the manufacturer’s instructions for proper installation.
5. Connect Wiring:
Connect the wiring of the flush-mount fixture to the existing electrical wiring in the ceiling. Ensure a secure and proper connection, matching the color-coded wires.
6. Secure the Base:
If the flush-mount fixture has a separate base, secure it to the fixture according to the manufacturer’s instructions.
7. Attach the Cover or Shade:
If your flush-mount fixture includes a cover or shade, attach it securely to the fixture. This step is crucial for both aesthetics and functionality.
8. Turn On Power and Test:
Restore power at the circuit breaker and test the newly installed flush-mount fixture. Ensure that it functions properly and provides the desired illumination.
9. Make Adjustments as Needed:
If the fixture includes adjustable components, such as swiveling arms or tilting shades, make any necessary adjustments to achieve the desired lighting angle.
IV. Considerations and Tips
1. Ceiling Compatibility:
Ensure that your ceiling is suitable for flush-mount fixtures. Some ceilings may have constraints that make recessed lighting the more practical choice.
2. Size and Style:
Choose a flush-mount fixture that fits the space both in terms of size and style. Consider the room’s aesthetic and the fixture’s design to create a cohesive look.
3. Ceiling Height:
Flush-mount fixtures are an excellent option for rooms with lower ceilings where recessed lighting might not be feasible. They provide ample illumination without compromising space.
4. Ambient Lighting:
Evaluate the type of ambient lighting you want to achieve. Flush-mount fixtures disperse light evenly across the room, providing a balanced and widespread illumination.
5. Bulb Compatibility:
Check the flush-mount fixture’s specifications for compatible light bulbs. Some fixtures may have specific requirements regarding bulb type or wattage.
Frequently Asked Questions:
1. Can I install a flush-mount fixture in any room?
Yes, flush-mount fixtures are versatile and suitable for various rooms, including bedrooms, hallways, kitchens, and bathrooms.
2. What is the average cost of a flush-mount fixture?
The cost varies depending on the brand, design, and features. Prices can range from $20 to $200 or more. It’s essential to find a fixture that meets both your aesthetic and budgetary preferences.
3. Do I need a professional electrician for this replacement?
While hiring a professional is advisable, replacing recessed lighting with a flush-mount fixture can be a DIY project for those with basic electrical knowledge. Ensure to follow safety precautions and local regulations.
4. Can I use LED bulbs with a flush-mount fixture?
Yes, many flush-mount fixtures are compatible with LED bulbs. LEDs are energy-efficient and have a longer lifespan, making them a popular choice for various lighting fixtures.
5. What are the common sizes for flush-mount fixtures?
Flush-mount fixtures come in various sizes, typically ranging from 12 inches to 24 inches in diameter. The size you choose depends on the room’s dimensions and your aesthetic preferences.
6. Can I install a dimmer switch with a flush-mount fixture?
Yes, many flush-mount fixtures are compatible with dimmer switches, allowing you to adjust the brightness according to your preferences and the room’s ambiance.
7. Is it possible to replace recessed lighting in sloped ceilings?
It can be challenging to install flush-mount fixtures in sloped ceilings. Consider consulting with a professional to determine the best lighting solution for such spaces.
8. Can I reuse the existing wiring from the recessed lighting?
In most cases, you can reuse the existing wiring if it meets safety standards and is compatible with the new flush-mount fixture. However, always inspect the wiring and consult with a professional if needed.
9. What types of bulbs are commonly used in flush-mount fixtures?
Flush-mount fixtures commonly use LED, incandescent, or fluorescent bulbs. The type of bulb may vary based on the fixture’s design and specifications.
10. Are there flush-mount fixtures with integrated smart lighting features?
Yes, many modern flush-mount fixtures come with integrated smart lighting features, allowing you to control the illumination using a smartphone or smart home system.
Conclusion: Illuminating Your Space with Elegance
Replacing recessed lighting with flush-mount fixtures is a transformative process that can enhance both the aesthetic appeal and functionality of your space. Whether driven by design preferences, ceiling constraints, or a desire for a different lighting ambiance, this transition is a feasible DIY project for those with a knack for electrical work. By understanding the steps involved, considering crucial factors, and adhering to safety precautions, you can illuminate your space with elegance, bringing a renewed sense of style to your home.